The belt sander is extremely useful for doing many different sanding jobs. It will produce a smooth surface on a board in less time and with less work than hand sanding.
The belt sander also offers an important advantage over disc sanders: The abrasive belt travels in one direction only, leaving no swirl marks. With a belt sander, you can sand parallel to the grain of the wood. This will produce a smooth finish free of scratches and tiny blemishes.
In addition, the belt sander has capabilities which permit you to sand end, miter, and bevel cuts quickly and accurately, sand convex and concave shapes, “round over” the edges and the ends of workpieces, and create compound curves in wood. You can also use the belt sander to sharpen tools.
The belt sander works by driving a continuous abrasive belt over two drums: a drive drum and an idler drum. The drive drum is covered by a nonslip rubber sleeve and drives the belt continuously in one direction. The idler drum is spring loaded to automatically tension the belt. The tension knob on the left side of this drum releases a torsion spring that presses the drum forward to tension the belt. The tracking knob (behind the tension knob on the left side of the belt sander) changes the angle of the idler drum in relation to the drive drum. This, in turn, centers the abrasive belt on the backup plate. Since the abrasive belt moves in a straight line, the machine is particularly suitable for sanding parallel to the wood grain. In some particular instances, especially when a lot of material must be removed, crossgrain or diagonal sanding techniques may be used.
The belt width doesn’t limit how wide stock must be in order to be sanded. Repeat passes and special procedures permit smoothing materials that are wider than the belt itself.
Belt Sander Setup and Features

To set up your belt sander, follow the instructions in the Owners Manual that came with your machine.
As you work with the belt sander, you’ll find that it has several special features:
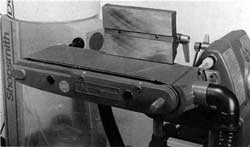
The belt sander mounts on the Mark V or on a Shopsmith Power Stand and is operated in either a vertical or horizontal position (Figure 19-1a).
The worktable is 6″ by 9″. It can be tilted from “0” to 20° into the belt, or from “0” to 45° away from the belt. The Shopsmith Miter Gauge fits in the slot on the worktable and can be locked in place. Also, the worktable has two holes cast into the table slot, making it easy to attach extensions and special fixtures.
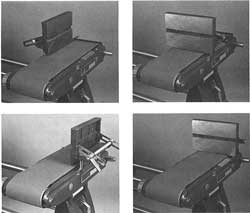
The worktable can be installed in four different positions on the hard side of the belt sander: parallel to the belt on either side of the machine or perpendicular to the belt in the center or at the back of the machine (Figure 19-2).
The working surface on the ‘hard side’ of the belt sander (the side with the backup plate) is 6″ x 14″ when the worktable is used as a backstop,or 6″ x 16-1/2″without the worktable. On the ‘soft side’ (the side without the backup plate), the working surface is 3″ x 16″. (When working on the ‘soft side’, use only the 3″ in the center of the belt to keep the belt tracking properly.)
Often, woodworkers use a combination of abrasive tools to smooth and shape a workpiece. When mounted on the belt sander auxiliary spindle, the drum sander will sand a tighter radius (1-1/4″) than you can sand on the idler drum. You can also mount the drill chuck on the belt sander auxiliary spindle. The chuck will hold smaller drum sanders and flutter sheets.
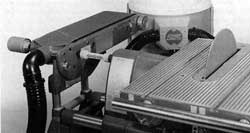
When the Mark V is used to power the belt sander, you can mount the sanding disc on the Mark V’s main spindle and use the two abrasive tools in combination. You can even use the dum sander (Figure 19-3). Warning: When tools are used in combination, never exceed the speed for the slowest tool. In this case that would be the disc sander.
When you are not using the auxiliary spindle, be sure to install the spindle cap. Insert the lip of the cap in the belt sander casting and give it a tap with a mallet to secure it. Later on, if you wish to use the auxiliary spindle, the cap can be removed with a pair of pliers; simply turn the cap and pull out at the same time.
The belt sander has a dust chute incorporated in its lower casting. This will direct waste material out of the machine and it will accept the hose from your dust collection system. Since most heavy-duty dust collection systems have fairly strong motors, it is good practice not to plug a dust collection system into the same circuit as the Mark V.
Abrasive Belts
Abrasive belts are available in three grits: coarse, medium, and fine. The belt sander accepts abrasive belts 6″ wide by 48″ long. Often, there are slight inconsistencies from belt to belt; some are slightly longer than 48″, some shorter. The automatic belt tensioning feature compensates for this. There’s no need for you to readjust the distance between the drums every time you change a belt, unless you use a nonstandard belt.
The grit you choose depends on the work you have to do. Remember that for the smoothest surface possible, always work your way from coarse to fine grits.
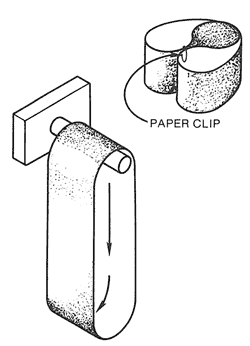
Belts should be carefully stored by using one of the methods shown in Figure 19-4.
Belt Sander Safety
Warning: Before using the belt sander, read and understand these important safety instructions:
Danger Zone–The belt sander danger zone is 3″ out from the abrasive belt in all directions. When you’re working with the worktable parallel to the belt or without the worktable, the danger zone also extends 6′ in back of the belt sander; the moving belt can throw stock in this direction. Never stand in line with the rotation of the belt.
- Wear proper eye and ear protection.
- Connect a hose from your dust collection system to the dust chute on the belt sander or wear a dust mask. When doing a lot of sanding, wear a respirator.
- If you’re not using a dust collection system, always keep your hands away from the dust chute when the machine is running.
- Be sure the bottom edge of the worktable is not more than 1/16″ above the abrasive belt when you are working. Because of the direction of rotation of the belt, small pieces of stock–or a finger, for that matter–can be drawn down between the abrasive belt and the worktable. The smaller the clearance between the belt and the worktable, the easier it is to prevent accidents. However, never let the edge of the worktable touch the abrasive belt. This will grind away part of the worktable.
- Never tilt the table toward the belt. The rotation of the belt could wedge your hands between the table and belt.
- Use the belt sander in either the vertical or horizontal position. Avoid positions in between unless you install the extra bolt.
- Do not use worn belts.
- Let glued-up stock dry at least 24 hours prior to sanding.
- Never sand particle board or paint that contains lead.
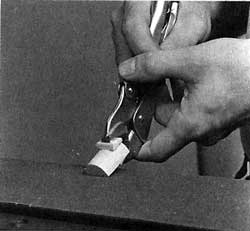
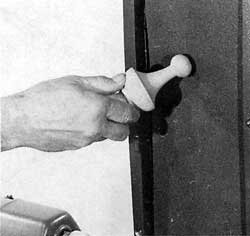
- Don’t attempt to sand pieces that are too small or too large to be safely controlled. To maneuver small workpieces on the belt sander, grip them in a pair of pliers (Figure 19-5), clamp them in a drill chuck, or make a special fixture to hold them. (Metal jaws should be covered with tape or leather so they don’t leave marks on the stock.) This will give you better control and keep your fingers out of the danger zone.
- Always check the machine before you turn it on. Remove any adjusting wrenches or anything that may be resting on the belt.
- Be certain the abrasive belt is tracking properly and does not rub against any part of the belt sander.
- Whenever possible, support the workpiece by backing it up or guiding it with the worktable.
- Check that the worktable is locked securely in place.
- Always turn the belt sander on first; then put the workpiece in position. Never turn the machine on with a workpiece resting on the belt.
- Never spin the abrasive belt, drive shaft, pulley, or V-belt to start the belt sander. Keep your hands away from these parts when the machine is plugged in.
- The belt sander must be unplugged from its power source before performing any adjustments or repair procedures, with the exception of belt tracking and crowning. Do not rely solely on the power switch.
- If you use the belt sander to grind or sharpen tools, first clean the sawdust from inside and around the machine 50 sparks do not ignite the sawdust. Work with the cutting edge pointing away from you and in the same direction as the rotation of the belt. Never mount wire or grinding wheels on the auxiliary spindle. Never grind or sharpen tools freehand; use the table, a fixture or clamps to support and guide the tool.
- If you’re using a Shopsmith Power Stand, be sure that you’re using the proper pulley and belt combination, and that the pulley and belt are properly guarded.
Belt Sander Speeds
Before you begin any belt sander operation, turn on the Mark V, set the speed according to Table 19-1 (below) and let the belt sander get up to speed. Generally the speed is determined by the size of the workpiece. For instance, if you’re sanding a large surface area, you’ll want to set the speed dial toward the lower end of the speed range. Lower speeds provide more torque, and the machine won’t “bog down” as easily.
| Table 19-1: Belt Sander Speed Chart | ||
| Sanding Area | Hardwood | Softwood |
| Large | E (1150 RPM, 900 SFPM) | F (1300 RPM, 1020 SFPM) |
| Medium | G (1450 RPM, 1150 SFPM) | H (1600 RPM, 1250 SFPM) |
| Small | H (1600 RPM, 1250 SFPM) | J (1900 RPM, 1500 SFPM) |
| Grinding or Sharpening Metal Tools — Slow (700 RPM, 550 SFPM) | ||
| NOTE: These speeds are for 60 hz. operations. |
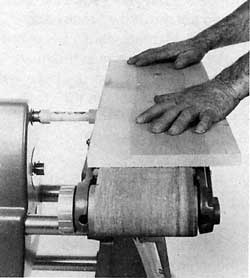
Surface Sanding
Surface sanding is best done with the belt sander in the horizontal position (Figure 19-6). Install the worktable and lock it in place no farther than 1/16″ above the abrasive belt.
Take a comfortable stance on either side of the belt sander. Your position is determined by whatever gives you the most control over the workpiece you’re about to sand.
Check the sander to see that nothing is resting on the belt; then turn it on. Hold the stock against the abrasive belt and sand with the grain.
The drag on the machine increases with the pressure of the stock against the belt, causing the motor to labor. Excessive pressure will also heat up the abrasive belt and the backup plate. The belt will wear out faster, and the backup plate will warp slightly, making it difficult to sand a flat surface. So put just enough pressure on the stock to keep it firmly in position. Let the belt sander do the work.
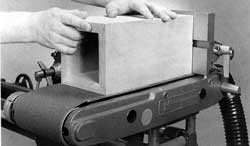
f the workpiece is shorter than 14″, use the worktable as a back stop. When sanding longer stock, secure the worktable parallel to the belt. Use the worktable as much as possible. The additional support adds safety and accuracy to your sanding operations. Even completely assembled projects can be sanded on all sides if you work as shown in Figure 19-7.
Hold the stock snugly against the worktable and flat against the belt. Move it slowly back and forth so that the entire surface is evenly sanded. If you don’t keep the stock constantly moving, it may heat up and start to “burn.” And be careful not to apply more pressure or dwell longer on one area of the workpiece than another; this will make the sanded surface uneven.
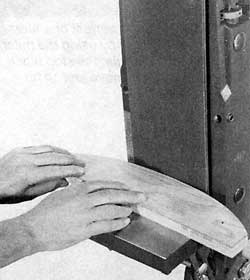
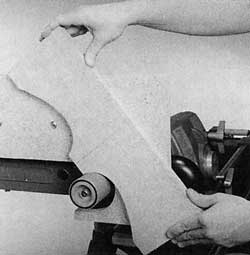
When you need to remove a lot of material or when the stock surface is very rough, start by sanding across the grain. Position the worktable so that it straddles the belt; then pass the stock across the belt sander using the worktable as a backup (Figure 19-8). The wood grain should be perpendicu~ar to the belt direction. When you’ve sanded away most of the stock you wish to remove, finish the operation by sanding with the grain. This will remove any blemishes caused by cross-grain sanding and leave a smooth surface on the workpiece.

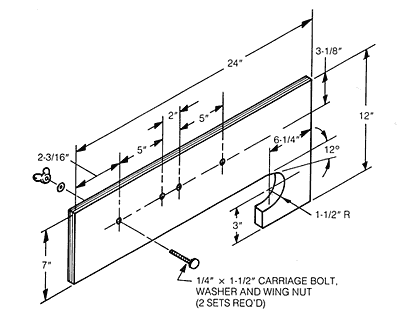
The use of a diagonal feed with the belt sander in the horizontal position, as shown in Figure 19-9, permits the surfacing of a workpiece wider than the normal capacity of the belt. It gives a smoother finish than the method shown in Figure 19-8. A table extension is used to support the stock. Figure 19-25 shows how to make the extension. The angle of the fence should be kept as small as possible to minimize crossgrain sanding. A diagonal feed will always result in some cross-grain scratches on the workpiece surface. Therefore, this operation must always be followed by straight with-the-grain sanding until the scratches are removed and the surface is smooth.
Sanding Large Stock
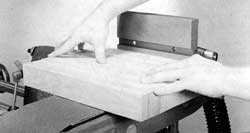
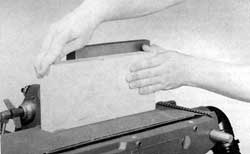
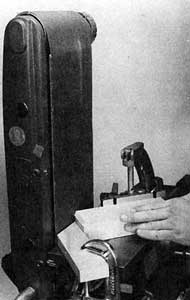
If you are sanding large pieces of stock, you may need to remove the worktable from the belt sander (Figure 19-10). As we said before, the worktable contributes to the safety and accuracy of your sanding chores. But if you’re careful, you can still get good results without it. Warning: Be careful of your fingers–do not hook them under the workpiece or you may accidentally rub them against the moving belt.
Secure the belt sander in the horizontal position. Turn on the machine and let it come up to speed. Then hold the stock in place, flat against the belt. You may not have to press down at all the weight of a large workpiece will usually supply ample pressure. As with smaller pieces, keep the stock moving so that the entire surface area is evenly sanded.
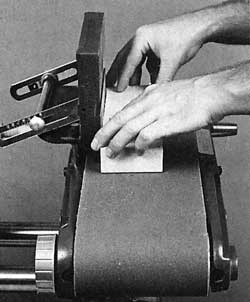
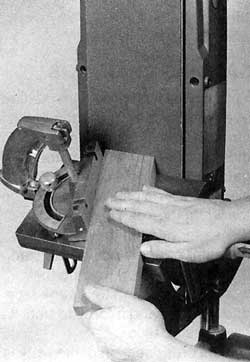
Edge Sanding
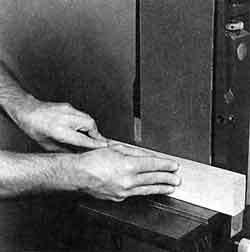
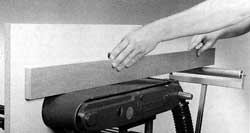
To sand the edge of a workpiece, secure the belt sander in the horizontal position. Install the worktable parallel to and no farther than 1/16″ above the belt. Hold the surface of the stock firmly against the worktable, while moving the stock back and forth (Figure 19-11). Be careful to sand the entire edge evenly. If you sand too much stock off the middle of a workpiece, it will develop a bow.
End Grain Sanding
When you saw cross-grain, the saw blade leaves the ends of your boards rough. This rough surface is unsightly and can often make for a weak or ill-fitting joint unless you “true-up” and smooth cross-cut end grain with a sander.
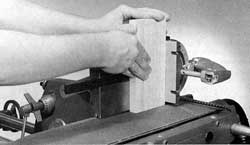
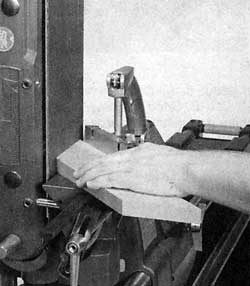
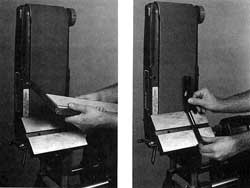
To sand the end grain of short workpieces, you can work with the belt sander in either the horizontal or vertical position, with the worktable parallel to the belt. To sand the end grain of long pieces, secure the belt sander in the vertical position. Use the worktable to support one end of the workpiece and a roller stand to support the other.
Lock the miter gauge in the slot in the worktable by tightening the Allen screw in the miter gauge bar. The face of the miter gauge will provide another support surface and hold the workpiece square to the belt. With a square or drafting triangle, check that the surface of the worktable and the face of the miter gauge are 90° to the belt. Make adjustments, if necessary; then check that the worktable is no more than 1/16″ above the surface of the belt.
Hold the workpiece firmly against the worktable and the miter gauge (Figure 19-12). Unlike surface sanding and edge sanding, do not move the stock back and forth. Instead, gently press the end of the stock against the moving belt. Be careful not to apply too much pressure or hold the stock against the belt for too long; the end grain may start to burn.
Vertical Belt Sanding
Up to this point we have mainly concerned ourselves with the horizontal operation of the belt sander. Actually, the operation in both positions is basically the same. For instance, in both positions, excessive pressure against the belt is never necessary. Forcing the work can result in stalling the belt, clogging the abrasive, burning the stock, and even in tearing the belt. A slow, steady feed, with an occasional retraction of the workpiece to allow waste to move off, will always produce the best results.
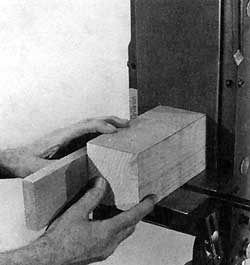
When sanding square ends, move the workpiece directly forward against the belt and use the miter gauge, with an extension if needed, to keep the work in correct position (Figure 19-13). To sand outside curves, hold the work flat on the table and then slowly, but steadily, sweep the workpiece across the belt while turning it to keep the curve tangent to the belt’s surface (Figure 19-14).
You can accomplish some surface sanding by sweeping work across the belt as shown in Figure 19-15. This is not really the ideal way to smooth surfaces since, even when working
with a fine-grit paper, the action will leave crossgrain marks. However, it’s not a procedure to ignore, especially if you wish to remove a lot of material quickly. Just be aware that the work will require some additional with-the-grain sanding.
Sanding Miters and Bevels
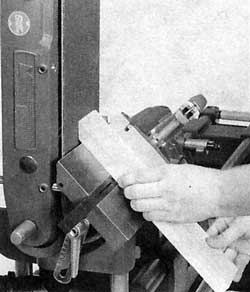
Sanding a miter or a bevel is similar to end grain sanding. Once again, lock the miter gauge in the worktable and use both support surfaces to ensure the accuracy of the operation.
To sand a miter cut, adjust the angle of the miter gauge and leave the worktable square to the belt (Figure 19-16). To sand a bevel cut, adjust the tilt of the worktable and leave the miter gauge square to the belt (Figure 19-17). Warning: Do not tilt the worktable in toward the belt. When the worktable is tilted in, there is a danger that the rotation of the belt will wedge the stock–or your hands–under the worktable. You can also set both the miter gauge and the worktable to sand compound angles (Figure 19-18).
o set the angle of the miter gauge or tilt of the worktable at the same angle as the cut, copy the angle of the cut with a sliding T-bevel (Figure 19-19A). Lock the arm of the T-bevel in place.
Place the base of the T-bevel against the hard side of the belt sander. Rest the arm of the T-bevel against either the face of the miter gauge (if you’re sanding a miter cut) or the worktable (if you’re sanding a bevel cut). Adjust the angle or the tilt until the arm of the T-bevel rests flush against the working surface (Figure 19-19B).
If either the miter gauge or the worktable is to be left at 90° to the belt, check it with a square and make adjustments if necessary. When you have completed all the angle and tilt adjustments, be sure that the worktable is no more than 1/16″ away from the belt.
Hold the stock firmly against the worktable and the miter gauge. Don’t move the stock back and forth; just press it gently against the moving belt.
Sanding Chamfers
You can form chamfers on the end of a workpiece by using the miter gauge and a stop block as shown in Figure 19-20. Set the miter gauge to the angle you need and clamp the stop block in position so the workpiece can be advanced just so far against the belt. With the miter gauge’s position locked, it’s just a matter of holding the work against the miter gauge face and then moving it forward until it hits the stop block.
If the cross section of the work is rectangular, the stop block must be adjusted to accommodate wide and narrow surfaces of the work. If the workpiece is square, then one stop block setting will do. If there are many chamfers to sand, change the position of the stop block to avoid working against just one area of the belt.
Chamfers can also be formed on the edges of a workpiece with the belt sander in the horizontal position. Position the worktable parallel to the belt and adjust the tilt. Hoid the workpiece absolutely flat against the worktable and move it back and forth paratlel to the rotation of the belt. Check it frequently to be sure that you’re sanding the chamfer evenly all along the edge of the workpiece (Figure 19-21).
Sanding Convex and Concave Curves
As mentioned in the beginning of this chapter, you aren’t limited to sanding just flat, straight surfaces; the belt sander will also sand curves.
The belt sander will quickly remove millmarks from curved workpieces. Or, when the shape of a curve is critical to the design or fit of a workpiece, many woodworkers cut wide of the mark and use the belt sander to sand the stock to its final shape. This technique gives you better control and accuracy when making oddshaped workpieces.
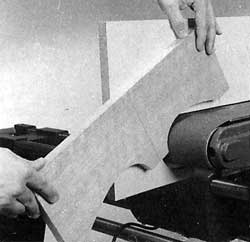
Figure 19-22. Use the worktable extension when sanding a concave curve.
To sand both convex and concave curves, secure the belt sander in the horizontal position. Install the worktable parallel to and no farther than 1/16″ above the belt. If you haven’t already done so, make the worktable extension shown in Figure 19-25; then bolt it to the worktable. This extension is essential when sanding both concave (Figure 19-22) and convex curves.
To sand convex curves, hold the workpiece firmly against the worktable and rock it against the direction of rotation on the hard side of the belt sander. Sand the curved edge evenly until all millmarks are removed and you achieve the desired shape. To sand concave curves, hold the workpiece firmly against the worktable and roll it against the direction of rotation on the idler drum. Once again, sand the curved edges evenly until all millmarks are removed and you achieve the desired shape.
When sanding with the idler drum, use very light pressure. If you press too hard, you’ll put an unnecessary strain on the sleeve bearings in the idler drum. You may also ruin the crown of the abrasive belt. Once the crown is destroyed, the belt will not track properly.
Sanding Compound Curves and Odd Shapes
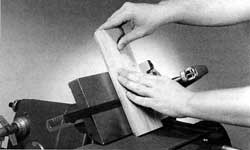
You can sand three-dimensional or “compound” curves on the soft side of the belt sander. There is no backup plate on this side, and the belt will conform to almost any shape that’s pressed against it. This is especially useful when rounding off lathe turnings or softening sharp corners and edges.
Secure the belt sander in the vertical position, without the worktable. Hold the workpiece and touch it to the abrasive belt (Figure 19-23). Use very light pressure. Hold the workpiece with the end you’re sanding pointing up. If you feel the belt sander dragging the workpiece up and out of your grasp, back off immediately. Rock the workpiece from side to side and back and forth until you achieve the desired shape.
When you use the soft side of the belt sander, always work in the center 3″ of the abrasive belt. If you press against the sides, the belt will creep off center.
Helpful Wood Sanding Hints
Getting a smooth, clean surface begins by making sure you hold the stock flat against the abrasive belt, keep the stock moving, and sand all areas evenly. Here are a few additional tips to help you get the best results:
Working in the Center of the Belt–Work in the center of the abrasive belt, especially if you’re sanding small workpieces. If you sand on the edges, the belt will drift off center, rub up against the belt sander frame, and begin to fray.
Cleaning Abrasive Belts–As you work with your belt sander, sawdust and other materials will accumulate on the belt, making the abrasive surface smooth and useless. You can extend the life of your abrasive belts by cleaning them occasionally with an abrasive cleaning stick. Simply hold the cleaning stick against the abrasive belt while the machine is running.
Sanding Glue–The belt sander is especially useful in “truing up” glue joints, sanding off high or uneven surfaces and excess glue. But glue will quickly accumulate on the belt, even more quickly than sawdust. And if the glue dries on the belt or melts into the fabric, it will be impossible to remove. To minimize the glue that accumulates on the belt and to safely sand glued-up stock, let all glue joints dry at least 24 hours. Then knock off the largest glue beads with a scraper or chisel before sanding the workpiece. Warning: Let glued-up stock dry at /east 24 hours prior to sanding. Sand the workpieces slowly, apply very light pressure, and don’t allow the friction of the belt to melt the glue. Clean the belt with an abrasive cleaning stick immediately after sanding.
Removing Paints and Other Finishes–The belt sander can also be used to clean up secondhand wood, especially wood that has been painted or finished. But like glue, these substances will quickly accumulate on your abrasive belt and stay there. Remove the majority of the old finish from the wood with a chemical paint remover and/or scraper. If you use a water-based remover, allow the workpiece to dry 24 hours before sanding it. Once the majority of the old finish has been stripped from the wood, sand the surface clean on the belt sander. Warning: Be sure to wear a dust mask and never sand surfaces painted with lead paint. When you’ve finished, clean the belt with an abrasive cleaning stick.
Using Additional Support–Extremely long or odd-shaped workpieces may require additional support in order to sand them safely and accurately. A roller stand and/or a worktable extension provide additional support during sanding operations (Figure 19-24). Construction details for building the extension are shown in Figure 19-25.
As shown in Figure 19-26, the worktable extension can also be used when a drum sander is mounted on the belt sander auxiliary spindle. Position the worktable on the right side of the machine, parallel to but facing away from the belt. Warning: Tape or tie up the table tilt lock so it doesn’t contact the belt.

