Most woodworking projects re-quire at least some assembly. This is especially true for projects such as tables, cabinets or bookcases where wide panels must first be built up from several narrow boards.
Traditionally, woodworkers have used dowels for these assemblies. As you might expect, dowels add strength to certain types of joints, but they serve an equally impor-tant function by keeping the pieces properly aligned during assembly and gluing. The major drawback with doweling, however, is that each hole must be perfectly positioned or the individual pieces simply won’t go together. Even a slight error can cause a lot of pounding and frustration.
During the 1950’s a new assembly system called biscuit joinery was developed in Europe. This system uses flat wooden wafers or biscuits which are glued into semi-elliptical slots on each side of the joint. Due to the shape of the biscuits, the exact location of the slot is much less critical than a dowel hole. Minor adjustments can even be made during assembly, so projects go together much more quickly and yet there is no sacrifice in strength or overall performance. That’s why biscuit joinery is rapidly becoming the preferred assembly system for professional furniture and cabinet makers worldwide.
In addition to its advantages for panel assembly, biscuit joinery can often be used to replace more complicated and time consuming techniques including spline, tongue-and-groove, mortise-and-tenon and dado joints.
Biscuit Joiner Setup and Features
The biscuit joiner housing attaches to the quill and the blade arbor attaches to the main power spindle of the Mark V’s powerplant (Figure-23-1). It may be used with either the Mark V Model 500 or Model 510. Follow the setup instructions in the Owners Manual that came with your biscuit joiner.
Some of the important features (Figure 23-2) and capacities of your biscuit joiner are:

- Spring-loaded workpiece guide and safety guard help improve operator confidence and safety.
- Engraved centerline on guide permits easy alignment of workpiece.
- Adjustable depth stops and guide rod grooves permit easy use of three different biscuit sizes (#0, #10 and #20) for a variety of applications.
- Adjustable pins in guide penetrate stock to provide more positive control and reduce kick-backs.
- Carbide-tipped blade will provide years of normal service without sharpening.
- Built-in dust chute for easy at-tachment of standard 2-1/2″ dust collection hoses.
Biscuit Sizes and Construction
Shopsmith biscuits are produced from select grades of beech. For maximum strength, the grain is oriented at a 45° angle to the long axis of the biscuit. During production, biscuits are exposed to many tons of pressure which compresses the fibers and produces a waffle-like surface for better glue absorption and adhesion.
When glue is applied to the biscuits, the moisture in the glue causes the biscuits to expand by about 15% of their original thickness and the joint becomes tight. Since this expansion occurs very quickly, glue should never be applied to the biscuits until you are ready for final assembly. Biscuits should also be protected against water or extremely high humidity. A coffee can with a tight fitting lid makes a good storage container.
Biscuits are available in three different sizes to meet a variety of applications (Figure 23-3). All biscuits are 5/32″ thick.
#0 biscuits are 1-3/4″ x 5/8″. They are best for joining smaller workpieces and for edge-to-edge assemblies where high stress is not anticipated. They are also useful for joining narrow pieces such as cabinet frames end-to-edge.
#l0 biscuits are 2-1/8″ x 3/4″. They are recommended for general purpose joinery on all types of projects.
#20 biscuits are 2-3/8″ x 1″. They are recommended for use on larger projects or joints–such as a table skirt and leg–which will be subject to high stress or twisting forces. They also provide greater penetration and a larger gluing surface, so they are well suited for plywood or particle board applications.
Biscuit Joiner Safety
Read, understand and follow all safety and operating instructions in the Owners Manuals that came with the Biscuit Joiner and with the MARK V on which it is mounted.
- Wear safety goggles, safety glasses with side shields or a full face shield.
- Tuck long hair under a hat or tie it up. Do not wear ties, gloves, jewelry or loose clothing. Roll sleeves up above your elbows. Wear non-slip footwear.
- Before mounting the biscuit joiner on the Shopsmith MARK V, turn on the MARK V and set the speed dial to SLOW. Then turn off and unplug the machine before proceeding.
- When mounting the biscuit joiner on the MARK V, be certain all locking screws are tightened securely before turning on the machine.
- Be sure the blade is mounted in the biscuit joiner with the teeth pointing in the direction of the arrows on top the housing. Installing the blade backwards will result in kick-backs and injury.
- Connect a dust collection system to the biscuit joiner dust chute or wear a dust mask.
- Do not allow anyone to stand directly in front of the opening of the dust chute.
- Move the workpiece slowly into the blade–never force it. Feeding stock too rapidly could cause kickbacks.
- Do not stand directly in-line with the workpiece being fed. In the event of a kickback, you will be hit.
- Do not rest fingers in the miter gauge slots where they could be trapped and pinched by kicked back stock.
- Always use the push block in your right hand to feed stock into the blade. This is especially important when working with small stock.
- Use your miter gauge and/or rip fence as a stop when working with stock less than 6″ long or wide.
- Always be certain the pins protrude from the guide before beginning operations. Failure to do this could result in the workpiece being grabbed and thrown by the rotating blade.
- Listen for chatter and signs of looseness at start-up. If you hear, see or suspect problems, turn off the power and unplug the machine immediately. Correct any problems before proceeding.
- Never use the biscuit joiner for jobs it is not intended to perform such as sawing, grooving, etc.
- Never exceed speed setting “T” on the MARK V’s speed dial for biscuit joiner operations.
- Never attempt to use the biscuit joiner on stock less than 3/8″ thick.
- Never operate the biscuit joiner without the housing and guard in position.
- Always keep the blade clean and sharp.
- Use only Shopsmith blades and parts for your biscuit joiner. Using non-Shopsmith blades or parts will create a hazardous condition and will void your warranty.
Basic Biscuit Joinery Techniques
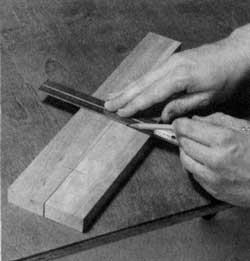
Marking Joints– The only marking normally required for biscuit joinery is to indicate the centerline for each biscuit’s location. These markings are usually made on the back side of the stock and may be made with a square (Figure 23-4) or freehand. Marked centerlines are then aligned with the engraved centerline on the biscuit joiner guide while quill and worktable adjustments are then used to control the biscuit’s vertical position. Figure 23-5 shows typical markings for various types of joints.
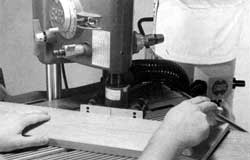
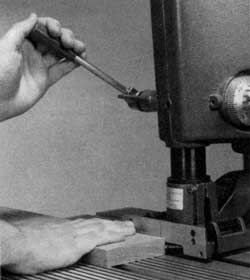
Basic Adjustments and Cuts– After mounting the biscuit joiner on the Mark V (Figure 23-6) and establishing a basic setup as shown in the biscuit joiner Owners Manual, several adjustments must be made before using the accessory. These basic procedures apply to all types of joints, so review these steps before each biscuit joiner operation.
Begin by selecting the size biscuit you will be using and set the depth-of-cut accordingly. This is done by unplugging the Mark V and compressing the spring-loaded guide until the desired grooves on the guide rods are even with the biscuit joiner housing. The three grooves in the guide rods indicate the correct settings for #0, #10 and #20 biscuits respectively.Adjust both depth stop setscrews (Figure 23-7), so that the guide cannot retract beyond the desired depth.
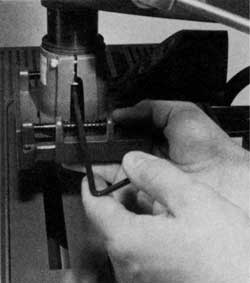
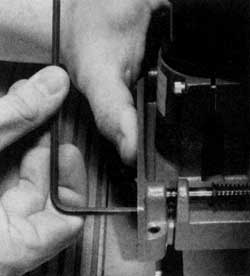
Figure 23-7. Adjust the depth-of-cut setscrews to match the biscuit size being used.
Next adjust the two pins in the guide face and lock them firmly in place (Figure 23-8). These pins provide important kickback protection and should penetrate about 1/32″ in hard woods and 1/16″ into softer woods.
When using the Mark V Model 510, position the worktable so the face of the biscuit joiner guide is above the table insert (Figure 23-6). This will keep the leading edge of the stock from interfering with the ribs in the worktable surface.
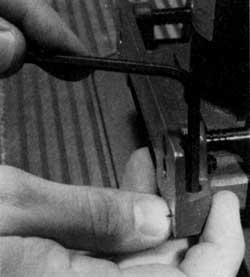
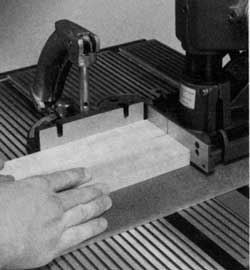
Finally, adjust the height of the biscuit joiner. Press the stock against the joiner fence until the blade is visible and adjust the quill until the blade is at the desired height (Figure 23-9). Normally the biscuit location will be about midway
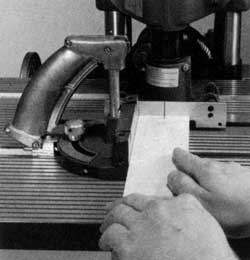
between the top and bottom, but higher or lower positions may occasionally be desirable. The most important factor is that the cuts be at the same height on both pieces of stock. When making these adjustments, the quill should not be extended more than 3″ and be sure to allow clearance between the biscuit joiner arbor and the worktable in order to prevent damage to the table surface. After all adjustments have been made, turn on the Mark V and set the correct speed. Guide the workpiece with your left hand until the biscuit centerline mark on the stock is aligned with the engraved centerline on the biscuit joiner guide. With a push block in your
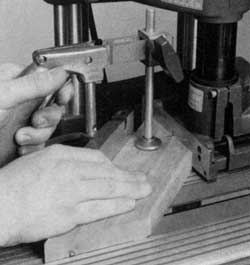
right hand (Figure 23-10), press the stock slowly against the guide, compressing the springs until the guide reaches the depth stops… then retract the stock. Repeat this procedure for each cut on both pieces of stock before changing the setup or height adjustment.
Panel Construction– Panel construction or edge-to-edge joinery is one of the most common woodworking operations. For best results, place the boards face down next to each other and mark biscuit centerlines on the back side. Then cut the biscuit slots and assemble the boards in this face-down position to help assure a flat, smooth final surface.
Typically, allow one biscuit for each foot of length in an edge-to-edge joint, with a minimum of three biscuits. Space the biscuits evenly and position the end biscuits at least 3″ from the ends of the boards so the boards will engage both of the pins in the guide when the biscuit slots are cut.
End Grain and High Stress Joints– Because of the wood’s high porosity, end grain joints–such as T-Frame, L-Frame or End Butt–are almost impossible to make with glue alone. Using biscuits will strengthen these joints because the biscuits are glued face-grain-to-face-grain.
For best results, use the largest biscuit available that will allow at least 1/4″ of stock at each end of the biscuit slots. On wide joints, such as a T-shelf, use multiple biscuits, allowing as little as 1/2″ between biscuit slots.
On stock over 1″ thick–especially on high stress joints such as a table leg and skirt–two or more rows of biscuits may be used for added strength (Figure 23-11).
When joining stock of different thicknesses-such as a 1″ thick skirt being joined to a 2″ square table leg-a thin piece of scrap wood or hardboard can be used as a shim (Figure 23-12) to eliminate the need to make quill adjustments for each thickness. This assures that the setback will be exactly the same on all joints and that the biscuit slots will be aligned correctly for easy assembly.
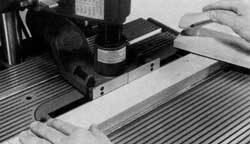
Short and Narrow Stock– Workpieces less than 6″ in width or length must be handled with special care because the pins in the joiner guide will not engage the stock and a kickback or injury is possible. For these cuts, align the centerlines and lock the miter gauge into the worktable to serve as a guide and stop. Hold the workpiece against the miter gauge face and advance it slowly and firmly into the biscuit joiner (Figure 23-13).
If you are making multiple matching components–such as door frames or rails and stiles for a cabinet front–you can make the setup once and cut all biscuit slots quickly and accurately.
Miter Joints– For corner miters, mount the biscuit joiner so that it faces the front of the Mark V with the guide perpendicular to the miter gauge slots (Figure 23-14). Adjust the worktable so one of the miter gauge slots is under the biscuit joiner and the quill is extended 3″ to avoid interference between the safety grip and the Mark V’s powerplant. Set your miter gauge to 45° (or to match the angle of the miter), place your workpiece against the miter gauge with the centerlines aligned, and adjust the safety grip to hold the stock securely.
Make the cuts by advancing the miter gauge and stock into the cut together. Do not slide the stock across the miter gauge and into the biscuit joiner as this will not produce an accurate cut. A piece of coarse sandpaper may also be attached to the surface of the biscuit joiner guide to keep the stock from creeping during the cut.

Edge Cuts in Wide Stock– Working with large or wide stock is similar to other edge joining operations, but additional support must be used to give the operator control of the stock for accuracy and safety. This is achieved by mounting the biscuit joiner diagonally, at about a 30° to 50° angle to the miter gauge slots (Figure 23-15). With the Model 510, check your setup to be sure the table height crank doesn’t interfere with the stock.
If additional support is needed, use the extension table system.

