The drum sander is a handy sanding device that’s used to smooth regular or irregular concave or convex edges, cabriole legs and other odd shapes, and internal cutouts – it can even be used for edge sanding and surfacing. The drum sander mounts on the MARK V main spindle or the belt sander. On the MARK V it may be used in the vertical or horizontal position, whichever mode is more convenient for the job at hand.
Types of Drum Sanders
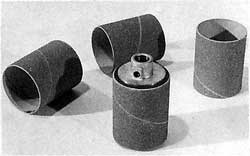
The drum sander is 2-1/4″ in diameter and 3″ long (Figure 18-1). Abrasive sleeves are easily mounted or removed by loosening the hex bolt that is in the base of the drum. This action relaxes or expands the drum’s rubber cylinder to either grip or release the sleeve. The grits are available in coarse (60#), medium (80#), and fine (100#)
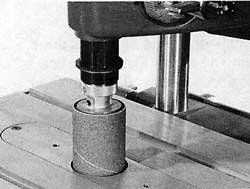
The drum sander mounts on the Mark V main spindle or the belt sander auxiliary spindle. The special shaper/drum sander insert (Figure 18-2) is used for most operations. The shaper or rip fence, when used with the drum sander, can accurately control the drum’s depth of cut when it is used to do edge sanding on straight edges.
Smaller drum sanders are available in sets that include drum diameters of 1-1/2″, 1″, 3/4″, and 1/2″. They are mounted in a three-jaw chuck or 1/4″ routerchuck. Warning: Smaller drum sanders should be used with the special insert shown in Figure 18-3. The special insert provides support for the workpiece.
Drum Sander Safety
Warning: Before using the drum sander, read and understand these important safety instructions:
Danger Zone-The danger zone on the drum sander is the area 3″ around the drum.
- Wear proper eye and ear protection, and a dust mask.
- Do not stand directly in line with the workpiece.
- When using the rip fence, avoid sanding workpieces with inconsistent widths.
- Do not sand more than 1/32″ off the workpiece in a single pass.
- Feed the workpiece against the rotation of the drum.
Drum Sander Speeds
Operate the drum sander at the speed recommended in Table 18-1. Start at a low speed and gradually increase to where you are getting the smoothness you need. The problem with excessive speed is that enough friction can occur to burn the wood unless the feed pressure is feather-light. Also, since friction heat can draw pitch or resin from the wood, excessive speeds cause more rapid filling and clogging of the abrasive. So work wisely at a reasonable speed and use only the amount of feed pressure required for the abrasive material to do its job.
| Table 18-1: Drum Sanding Speed Chart | ||
| Abrasive | Hardwood | Softwood |
| Coarse | H (1600 RPM) | I (1750 RPM) |
| Medium | I (1750 RPM) | J (1900 RPM) |
| Fine | J (1900 RPM) | K (2050 RPM) |
| NOTE: These speeds are for 60 hz. operations |
Edge Sanding
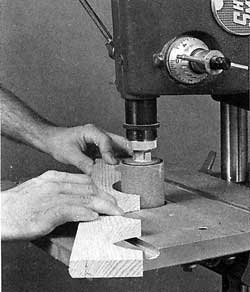
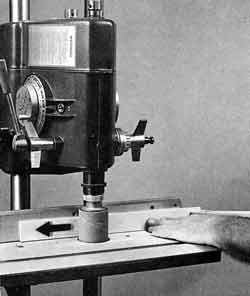
Figure 18-4. Work this way when sanding edges. The setup assures that sanded edges will be square to adjacent surfaces.
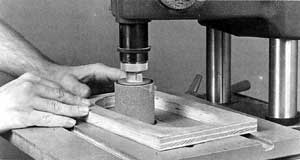
Most edge sanding is best done with the machine in the vertical position (Figure 18-4). The setup assures that sanded edges will be square to adjacent surfaces. Move the workpiece slowly, but keep it in constant motion. The drum will continue to sand if you hold the workpiece still and this will cause indentations that will spoil the edge. Move the workpiece from left to right, against the drum’s direction of rotation.
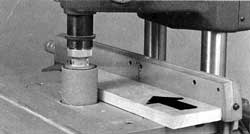
Sanding operations will be most efficient and abrasive materials will last longer if you do initial cutting so there is the least amount of material for the sander to remove. When you are doing a lot of sanding, occasionally adjust the drum’s vertical position so you will be using all of the abrasive surface.Internal edges are sanded in a similar fashion, the only difference being that you position the work piece before extending the quill (Figure 18-5). The drum sander’s position is maintained by locking the quill.
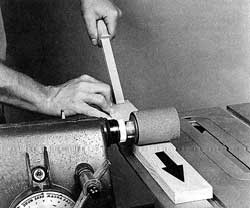
You can smooth straight edges freehand by passing them across the drum; but a more efficient technique, when stock width permits, is to work with the rip fence as shown in Figure 18-6. The drum’s depth of cut must be very light, only enough to smooth the edge. When the fence is situated between the drum and the way tubes, the pass is made from right to left. This setup is also used to edge sand any number of pieces to exactly the same width.
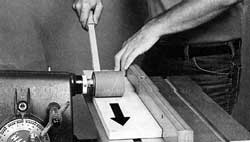
The same setup can be used if you work with the shaper fence. The amount of material to be sanded off is controlled by adjusting the infeed fence as you would when doing a shaping cut that removes the entire edge of the stock. There is no limit to how wide the stock can be when you are using the drum sander/shaper fence arrangement.
Surface Sanding
Surface sanding is done with the Mark V set in the horizontal position. Place the stock at the edge of the table; then position and raise the table so the stock just touches the abrasive sleeve. Remove the stock and turn on the motor; then feed the stock, between the drum and table, against the drum’s direction of rotation. This means standing behind the Mark V and moving the stock toward the speed dial side of the power plant (Figure 18-7). Warning: Do not stand directly in line with the stock.
Stock that is wider than the drum can handle in a single pass can be sanded by making additional passes. An example procedure, with the fence used as a guide, is shown in Figure 18-8. Assuming that the width of the stock is less than twice the length of the drum, set the fence to accommodate the width of the stock and make one pass with the stock riding against the fence. Then, after turning the stock end-for-end, make a second pass.
Surfacing Thin Slats
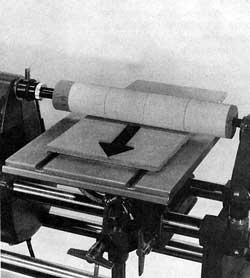
Surface sanding thin material can be difficult to do, especially if you want the slats to have a uniform thickness. As long as the slats are not wider than 2-1/2″, the work can be done accurately and efficiently by using the setup shown in Figure 18-9. Position the fence so the drum will bear lightly against the slat. The slats are fed in at the rear and pulled out at the front of the machine. Be sure to keep them moving. Any hesitation will cause the drum to form an indentation.
Making a Drum for Thickness Sanding
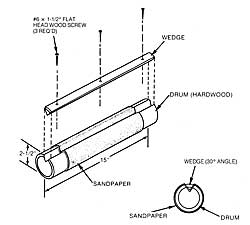
A drum sander you can make, and which is used with the Mark V in the lathe mode, is shown in Figure 18-10. The drum affords several advantages: It can surface sand material more than 12″ wide; the large table surface provides excellent support for the workpiece; and if the drum is accurately made and the table’s alignment is correct, the material will be sanded to a uniform thickness.
Use a hardwood like maple or birch. Construction details of the drum sander are shown in Figure 18-11.
Don’t use excessive speeds, feed too fast, or try to take too deep a bite. Light passes will do a much better job than a single heavy one. Warning: If you try to remove more than 1/64″ of material at once, you might cause the drum to be thrown from its mounting or the stock to be pulled from your hand and thrown.
Pattern Drum Sanding
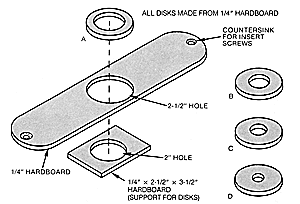
Pattern sanding is done by making a special insert with a guide disk having a diameter equal to the drum’s diameter (Figure 18-12). It is important that the disk be centered exactly under the drum; therefore, when making the insert, be sure to follow the instructions shown in Figure 18-13.
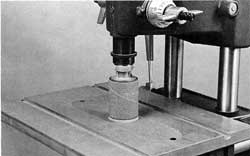
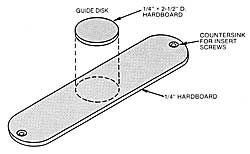
Figure 18-13. To make a special insert for pattern sanding, use a drum sander insert as a pattern. Locate the position of the guide disk with the drum sander mounted on the spindle. Attach the disk with glue and 1/2″ brads. Click image to see larger view.
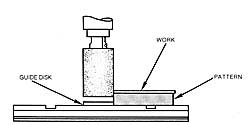
Figure 18-14 shows how the sanding is done. The pattern, which is the shape of the work you need, rides against the guide disk. The rough-cut work is held to the pattern with small brads or is impaled on brad points that project from the pattern. As you make the pass, keep the pattern in constant contact with the guide disk so that the work will be sanded to match the pattern.
Pattern sanding on the drum will work only if you accept it as a smoothing operation. When you rough-cut the workpieces, be sure they are not more than 1/16″ or so oversize.
Sanding Odd Shapes
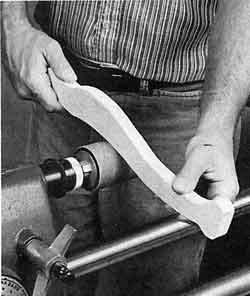
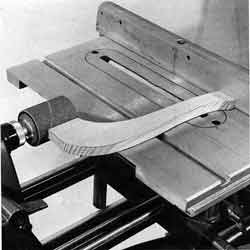
Smoothing the surfaces of workpieces like the cabriole leg is typical of sanding operations best handled on a drum sander. Because of the project’s elaborate contours, it is difficult to provide a support surface for the workpiece; so the operation is done freehand with the operator moving and guiding the workpiece (Figure 18-15).
Keep a firm grip on the workpiece and move it along steadily so the drum can’t dig in at any point. Avoid excessive feed pressure. If necessary, go over an area several times. Warning: Always move the workpiece so you are feeding against the drum’s rotation.
Fitting a Leg to a Round Column
A furniture leg that must fit against a round column must have a radius formed on the edge that mates with the column. This can be accomplished by setting up the Mark V as shown in Figure 18-16. The table’s height is set so the centerline of the workpiece is on the horizontal centerline of the drum. It may not be necessary, but the rip fence or a fixture can be used to keep the work square to the drum.
Move the workpiece forward so the edge to be sanded will be parallel to the surface of the drum. Don’t force; let the abrasive work at its own speed. The cove that is formed in the workpiece will be determined by the diameter of the drum. If it isn’t suitable for the connection you must make, you can modify it by hand with sandpaper or a file.

