The difference between a plain edge and shaped one is often enough to elevate the beauty and elegance of the simplest project. The shaper not only makes it possible to embellish otherwise square, plain edges, but it also has practical applications as well. Among other things, you can form the parts of a drop leaf table joint, do drawer joints, make a tongue-and-groove joint, shape half-round or curved moldings, and so on.
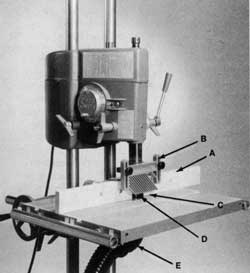
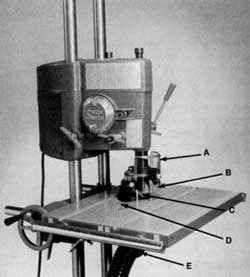
The Mark V becomes a very efficient shaper when it is in the drill press mode and equipped with the special shaper accessories (Figures 9-1 and 9-2). The shaper insert should always be used to provide maximum support for the work around the cutting tool. For fence shaping the shaper fence is secured to the table. Both fence boards are adjustable endwise and front to back, so the opening for the cutters can be kept small for safety. The infeed board is screw-adjusted for depth of cut. Pins that are screwed into the shaper insert are used for pin shaping.
Shaping Safety
Warning: Before using the shaping accessory, read and understand the following safety instructions:
There are two major factors to consider about the safe operation of the shaping accessory: the speed and the sharpness of the cutter. Remember that the faster the speed and the sharper the cutter, the smoother the cut.
Danger Zone–The danger zone extends 3″ out from cutter in all directions. Work cautiously and slowly, especially when shaping against collars. Working this way will not only keep your hands safe, but will also increase the quality of your output.
Guards for the Shaper–Shaper guards must be used for all shaping operations. The fence guard is mounted on the shaper fence and the feather board guard is mounted to the quill when fence shaping. The feather board guard is adjustable to accommodate various thicknesses of stock.A feather board is used to hold stock up to 6″ wide against the fence.
The circular shield and brush assembly is mounted on the quill when pin shaping. The shield is adjustable to accommodate various thicknesses of stock.
- Wear proper eye and ear protection.
- Always use the shaper insert.
- Wear a dust mask or connect a dust collection system to the dust chute. Keep the dust chute mounted to the shaper insert even if you do not have a dust collection system. The chute guards the cutter below the table. You can collect dust and chips in a trash receptacle positioned beneath the table.
- Tuck long hair under a hat or tie it up. Do not wear ties, gloves, jewelry or loose cloth-ing. Roll sleeves up above your elbows. Wear nonslip footwear.
- When mounting cutters and collars, make certain that the tongue washer is correctly installed and directly under the hex nut and that the nut is tight. Also that the arbor setscrew is tightened against the flat of the spindle.
- Be sure the cutter(s) is positioned with the cutting edge facing to the left. o Listen for chatter or signs of looseness at start-up. If you hear, see or suspect problems, turn off the power and unplug the machine. Correct any problem before proceeding.
- Keep cutters clean, maintained and sharp.
- Operate the shaper at speeds between “U” (4400 RPM) and “Fast” (5200 RPM).
Fence Shaping
- When edge shaping, always use feather boards to guide the workpiece.
- When shaping the end grain of stock 2″ to 6″ wide, use your miter gauge with safety grip to control the stock, and keep the feather board guard in place to protect your hands and hold the stock down. Do not shape the end grain of stock less than 2″ wide.
- Always feed the workpiece from left to right against the rotation of the cutter. Otherwise a kickback will occur.
- Use a push stick to feed a narrow workpiece. When it is necessary to push a workpiece underneath the feather board guard, use a long piece of scrap wood.
- Avoid taking deep cuts. If the amount of material to be removed is substantial, make more than one pass. Set the fence to make a partial cut and then readjust the fence accord-ingly to reach the final shape.
- Cut with the grain.
- Do not stand in line with the workpiece being fed. In the event of a kickback you could be hit.
- Feed the workpiece slowly. Use extra care in shaping workpieces that contain figured grain or knots, as these may cause kickbacks.
Pin Shaping
- Always feed the workpiece against the rotation of the cutter, left to right in front of the cutter, right to left if cutting with the rear of the cutter. Otherwise a kickback will occur.
- Always use at least one push block to help control the workpiece. Use two if possible.
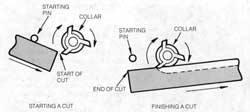
- Always use the left starter pin. Use the right pin whenever possible.
- Hold the workpiece firmly against the left starter pin and feed the workpiece slowly into the cutter.
- Internal shaping, i.e., the shaping of the edge of a hole or small opening (less than 6″ in diameter) in any shape, should not be attempted.
Shaper Cutters
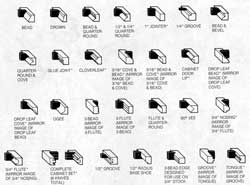
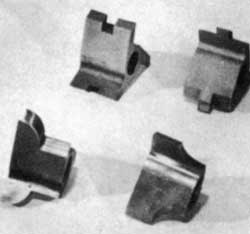
Attempting to maintain a complete assortment of cutters can be expensive. A careful selection of from ten to twenty shapes (Figure 9-3), picked for the type of work you do, is adequate. With a basic assortment on hand, you can always add a new cutter as the need for it arises.
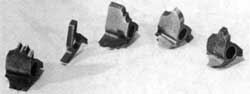
Probably the most practical type of shaper cutter for home workshop use is the three-lip shaper cutter shown in Figure 9-4. This type of cutter is available in a great variety of shapes: some are combination cutters, others have a profile that will produce a particular shape such as a tongue or groove. Other shaper cutters come in sets so mating parts can be cut (Figure 9-5).
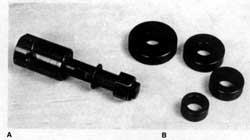
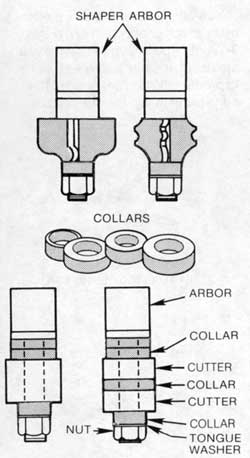
The shaper arbor holds standard shaper cutters and collars (Figure 9-6). The arbor is locked firmly in place by securing its setscrew against the spindle’s tapered flat. The collars are used for depth-of-cut control and for cutter spacing. The cutters and collars are secured to the arbor with a nut. Be sure the nut is tight before starting the operation.When positioning for cutter height, make the major adjustment by raising or lowering the table. The final setting is made with the quill feed lever. On shaping operations, especially at high speeds and on hardwoods, quill extension should be held to a minimum.
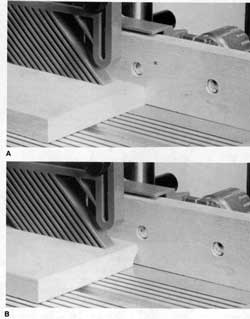
Figure 9-7. Combination cutters can do various jobs. (A) Here a quarter-round and cove cutter is used to round off the edge of a workpiece. (B) The same cutter is shown forming a cove.
It is not usually desirable to use the full shape of the cutter to form a molding. How one versatile cutter is intended to be used is partially described and shown in Figure 9-7.
A wide variety of shapes can be made by changing one or more of the following:
- The depth of cut, which is adjusted by moving the table or the fence or by using collars.
- The height of the cutter in relation to the work, which is controlled by the table or the quill feed lever.
- The position of the work when making the pass.
- Figure 9-8 shows a few shapes formed by a single cutter; in this case a combination cutter that can be used to shape a bead or two sizes of quarter-round was utilized. Some of the shapes were cut in a single pass, others required two or more passes, but the same cutter was used every time.
The important thing to remember is that not all cutters are intended to cut their full-profile shape, even though they can be used that way. Most of them are combination cutters.
Collars come in various sizes and are used to control the depth of cut and to position the cutter. As shown in Figure 9-9, they may be set over, under or between cutters. Be sure to position the keyed washer so it seats correctly in the arbor slot. Never set up cutter/collar assortments that don’t allow the arbor nut threads to be fully engaged.
Since the collars lock on the arbor together with the cutters and turn at the same speed, there is the potential, when the workpiece bears against them, of scoring or even burning the workpiece. Keep the collars clean, smooth, and free of knicks and burrs. When cutting, hold the workpiece against the collars with just enough pressure to maintain contact.
Cutter Storage
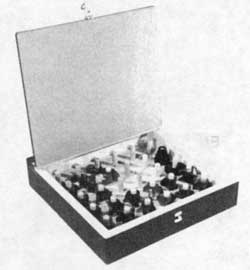
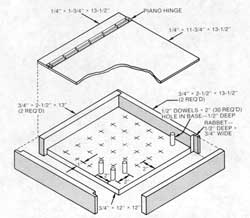
Three-lip shaper cutters should be respectfully cared for. They are an investment, and they work best when they are clean and sharp. They can be kept in the plastic cases they are packed in, but selecting the cutter you want will be more convenient if you make the case shown in Figure 9-10. It will hold up to 30 cutters, or you can use some of the dowel posts for storing the collars. Use gummed labels near each post to identify the cutter. Construction details for the case are shown in Figure 9-11. Cutters should be carefully cleaned before storage.
Fence Shaping
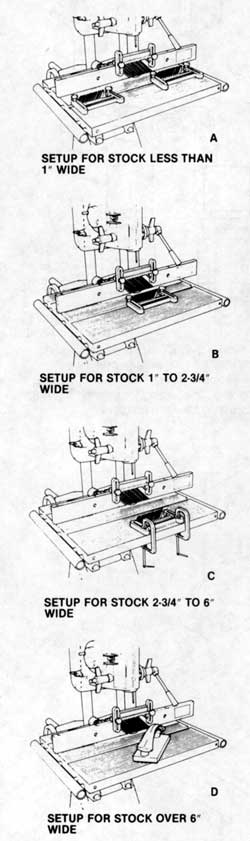
When fence shaping the width of the stock determines the position of the stock and the shaping accessories used:
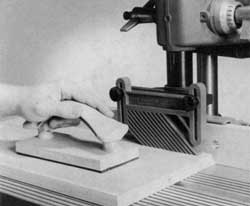
- Stock less than 1″ wide, use the feather board guard, one feather board on the infeed side and an additional feather board on the outfeed side, secured in the table slot (Figure 9-12A). Use a push stick or when it’s necessary to push stock underneath the feather board, use a long piece of scrap wood.
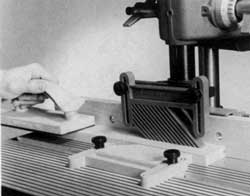
- Stock 1″ to 2-3/4″ wide, use the feather board guard and a feather board secured in the table slot (Figure 9-12B).
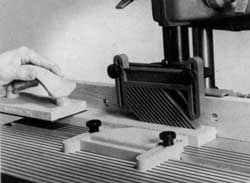
- Stock 2-3/4″ to 6″ wide, use the feather board guard and a feather board secured in the table slot with C-clamps(Figure 9-12C).
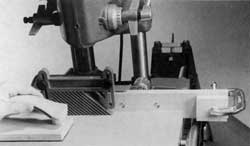
- Stock over 6″ wide, use the feather board guard and a push block (Figure 9-12D).
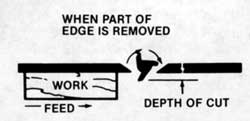
You can remove the entire edge of the stock or only part of it (Figure 9-13). It depends on the cutter you are using and the shape you wish to produce. When only part of the edge is cut away, the surfaces of the fence boards must be on the same plane (Figure 9-14). The workpiece moves across the cutter and receives the same support from the outfeed board as it did from the infeed board.
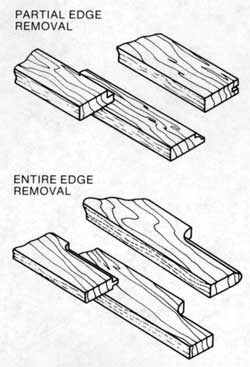
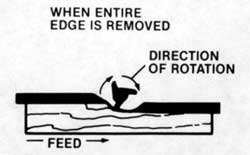
When the entire edge of the workpiece is removed, fence alignment must be adjusted to suit the depth of cut. You can do this by offsetting the outfeed board (Figure 9-15). Once the work has passed the cutter, the position of the outfeed board must compen-sate for the change in the stock’s width.
Use a feed that is slow and steady. A slow feed allows the blades of the cutter to work longer over a given area of the wood and this produces smoother cuts, while allowing the cutter to work without choking. Of course, this can be overdone. Judge feed speed so the cut progresses smoothly without straining you or B the cutter. Try to work so you are cutting with the grain of the wood. When you must cut against the grain, use an even more conservative feed speed.
Some shapes are attained by making two or three passes. Reposition the workpiece and the cutter after the first pass to provide the additional cut that completes the form. Operations like this are best handled by first sketching the shape required on the edge of the stock, then selecting cutters that will fit the contours of the form.
Drop Leaf Joint
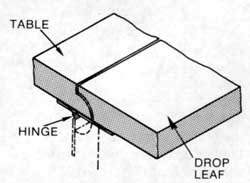
This popular joint (Figure 9-16), is used to extend the size of a table by means of leaves that are hinged to a fixed center section. The drop leaf joint, or “rule joint” as it is sometimes called, is preferred over a simple butt joint because of its neater, more professional appearance.
With the special set of cutters, you can shape the edges of both the table and the leaf so they will match perfectly. The table edge is formed as shown in Figure 9-17. The shoulder doesn’t have to be as wide as it is on the cutter; this will be dictated by the thickness of the tabletop and controlled by the height of the cutter in relation to the workpiece when making the pass. The full radius, however, should be formed since it will have an impact on the appearance of the joint when the leaf is raised. Figure 9-18 shows a leaf edge be-ing shaped.
Tongue-and-Groove Joint
This joint is frequently used when joining boards edge-to-edge. The mating forms can be shaped by working with the set of cutters, one to form the tongue, the other the groove, but it’s also possible to do both parts of the joint by working with a single blank cutter; it depends on the thickness of the stock. For example, if the stock is 3/4″ thick and you have a 1/4″ blank cutter, the work can be done as follows:
Set the height of the cutter to form a groove exactly centered in the edge of the stock. Organize the shaper fence so the groove will be as deep as the cutter is wide; then make two passes, the second one after the workpiece has been turned end-for-end (Figure 9-19)
The tongue is formed as shown in Figure 9-20. Once the cutter height has been adjusted, it’s just a matter of forming opposing rabbets on each edge of the work-piece. Make the first cut. Do not make a change in depth of cut. Then turn the workpiece over and make the second cut. Be sure the tongue that results will be a nice sliding fit in the groove.
Stopped Cuts
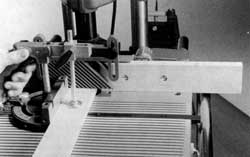
Figure 9-21 shows examples of stopped cuts made by using stop blocks. Stop blocks, spaced to suit the cut length, are clamped to the shaper fence as shown in Figure 9-22. Brace the end of the workpiece against the infeed stop block and then swing it slowly into the cutter until its edge is snug against the fence. Make the pass until the workpiece butts against the out-feed stop block. Turn off the machine and let it come to a complete stop. Carefully pull the trailing end away from the fence.
You can do this kind of work on pieces that are too long for the standard shaper fence by making special long fence boards like the standard fence boards.

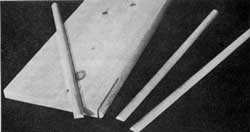
Slim Moldings
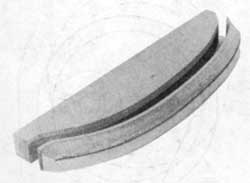
Warning: Trying to form slim moldings by working on narrow pieces of wood is a dangerous practice. To make slim moldings, shape the edge of a large workpiece and then, working with either a hollow-ground or carbide-tipped saw blade, cut off as much as you need. This technique is also valuable because it enables you to form moldings you would otherwise have to buy (for example, half-rounds); and you can form the moldings in whatever kinds of wood you choose, an option not available through commercial supply houses.
Figure 9-23 shows the start of such an operation using the nosing cutter that is part of the flute and nosing set. After the edge is shaped, the half-round is removed by sawing (Figure 9-24).

Shaping Cross Grain
Cross-grain cuts are seldom as smooth as those made with the grain. To get the best results, use a very conservative feed rate and keep the workpiece moving steadily. If the cuts are deep, make more than one pass, adjusting the cutter after each pass until the shape is fully formed. Warning: If the workpiece is not wide enough to have sufficient bearing against the boards, use the miter gauge and safety grip to secure the workpiece while making the pass (Figure 9-25).
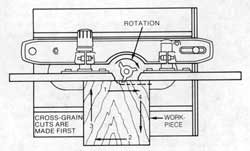
If you are shaping a square corner, always make the cross-grain cut first. The second cut, made with the grain, will remove the slight blemish that is inevitable at the end of cross-grain cuts. When you must shape all four edges of a workpiece, do the cross-grain cuts first, then the final cuts with the grain (Figure 9-26).
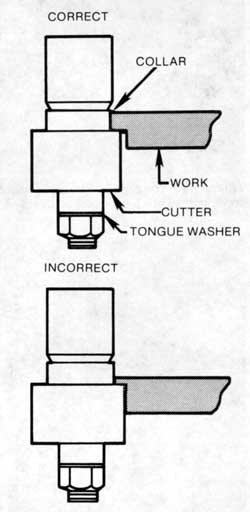
Figure 9-27. Collars control the depth of cut. Always be sure there is enough bearing surface between the workpiece and the collars.
Pin Shaping
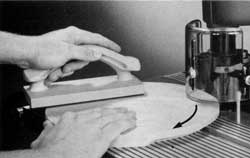
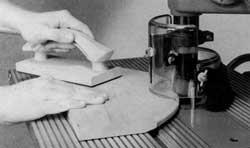
Workpieces that are circular or have curved edges are done by pin shaping. This is a special procedure made possible by mounting collars on the arbor and using the shaper insert equipped with pins.
The collars, the pins and the table provide the bearing surfaces for the workpiece. The cutter may be over the workpiece or under it. You can use more than one collar of the same diameter to guide against thick stock. Warning: The important factor is the contact area between the workplece and collars (Figure 9-27). A small amount of contact area (less than half the collar thickness) is not adequate; always organize for maximum collar contact so the work will have good support.
Since the collars turn with the cutters, they can score or burn the Work unless they are kept smooth and free of gum, dirt, or dust. When you bear against them, use only as much pressure as you need to maintain the contact.
The cutters will function whether they are over or under the work-piece. The cut is easier to see and, some operators feel, is easier to control when the cutter is on top. Warning: If the workpiece is tilted up at any time during the pass, the cutter will dig into it. Positioning the cutter under the workpiece is the safest way to operate. Also, slight accidental lifting of the work during the pass will do no harm.
Basic Procedure
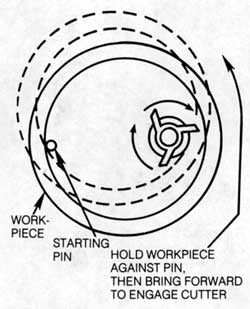
The major factor to consider when pin shaping is the initial contact of the workpiece with the cutter. Warning: The workpiece, if moved directly into the cutter without support, will be kicked back. This is where the pins come into play. Start the pass by bracing the workpiece against the pin at the left of the cutter. With the workpiece firmly against the pin, slowly advance it to contact the cutter until it is solidly against the collars. Once the cut is well started, you can swing free of the left-hand pin and allow the workpiece to bear only against the collars (Figure 9-28). Toward the end of the cut, you can allow the workpiece to be supported by the right-hand pin.
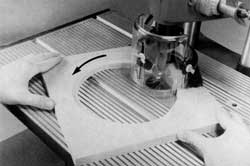
Circles and Irregular Curves
Start shaping the edge of a circular workpiece by bracing it solidly against the left starter pin and then advancing it slowly to engage the cutter. After the workpiece bears firmly against the collar, you can choose to maintain the pin contact as you turn the workpiece clockwise (Figure 9-29) or swing it clear so only the work-to-collar contact is maintained. You can continue in this manner to complete the pass or, at the end of the cut, allow the right-hand pin to support the workpiece.
Irregularly curved edges, such as those on fancy picture frames, wall plaques, free-form tabletops, and so on, are shaped much like circular pieces except that you should judge when to accept support from the left-hand pin and when to allow the workpiece to bear only agianst the collar (Figure 9-30). Always start by bracing the workpiece against the pin. Work slowly and carefully, especially when you must turn a sharp corner. Warning: Keep your hands on the outside edges of the workpiece so they will be away from the danger zone.
Slim, Curved Moldings
To safely work on slim, curved moldings, you must follow the principle that was described for slim moldings: shape the edge of a workpiece that is large enough to be safely handled (Figure 9-31). Obey the rules that apply to pin and collar support for the workpiece. After the shaping is finished, use a scroll saw or bandsaw to remove as much of the edge as you need (Figure 9-32).
Inside Edge Shaping
Shaping a rabbet on the inside perimeter of a circular picture frame to accommodate the glass is a typical example of inside edge shaping (Figure 9-33). The workpiece is placed in position before the cutter is extended for depth of cut. The workpiece is braced against the right-hand pin and then swung into contact with the cutter until it bears solidly against the collar. It is then rotated counter-clockwise so the pass is made against the direction of rotation of the cutter (Figure 9-34).
This kind of work doesn’t have to be limited to forming rabbets for glass in circular frames. By working the same way, you can add decorative internal edges on circular workpieces.
Special Techniques
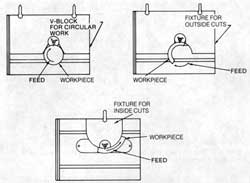
For production runs on specially shaped pieces, it is good practice to create setups that provide accuracy while allowing you to work safely. The ideas that are shown in Figure 9-35 are diagrammed just to demonstrate how fixtures can be used.
The fixtures may be cut to shape on a scroll saw or bandsaw, sanded, and then clamped to the worktable to serve as guides when feeding the work. Quite often it is possible to use the scrap material from a cut piece as the guide. For example, the scrap piece from a circular cutout might make a good guide for shaping the edge of a circular workpiece. This idea, of course, calls for very careful initial cutting.

