The strip sander is designed to do intricate detail sanding. It will sand the straight, angled, curved, convex or concave edges and ends of workpieces quickly and accurately. A unique feature of the strip sander is its ability to sand the internal edges of round and oval picture frames, decorative shelf supports and other projects that have been cut out using the piercing cut method on a scroll saw or jigsaw. You can also use the strip sander to polish metal and grind tools.
Strip Sander – Setup and Features
To set up your strip sander, follow the instructions in the Owners Manual that came with your strip sander.
As you work with the strip sander, you’ll find that it has several special features:
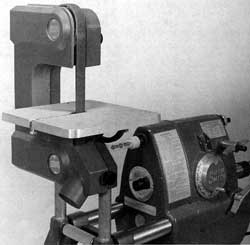
- The strip sander mounts on the Shopsmith MarkV (Figure 20-1).
- The dust chute in the bottom of the cover will allow you to connect the hose from your dust collection system during wood sanding operations.
- The strip sander can accommodate stock of any size and shape within these limits: 6″ in front of the platen (contact with the table), 3-1/4″ thick between the table and the upper part of the housing, and 6-1/4″ wide in the throat (back of the platen housing).
- There are three platens – 1 ” flat, 1/2″ flat and 1/2″ radius curved – that back up the belt.
- The table can be tilted from “0” to 45-degrees forward. Its surface is 11″ x 11″. A table stop automatically positions the table at 90-degrees.
- A tensioning spring automatically keeps the belt at the proper tension.
Strip Sander Safety
Warning: Before using the strip sander, read and understand these important safety instructions:
- Wear proper eye and ear protection, and a dust mask.
- Keep your hands and fingers out of the danger zone. The danger zone is 3″ out in all directions from the belt.
- Keep the belt tracking properly during all operations.
- Never reach close to the belt or underneath the table while the machine is running.
- Always use the table to support the stock. The only exception to this is when you are sanding against the tracking wheel. Then hold the stock securely in your hands and keep your hands and fingers 3″ away from the moving belt.
- Sand on the downward motion side of the belt only. The downward motion keeps the belt tracking properly and helps hold the stock down against the table.
- Never attempt to sand an internal area smaller than the belt will allow. This will pull the belt off the tracking wheel causing the belt to cut into the frame or cover, and can cause the belt to break.
- Support long stock with a roller stand.
- Use pilers to hold small pieces of stock against the moving belt. Never use your hands.
- If the belt breaks, turn off the machine and stand away until the machine comes to a complete stop.
- Secure the Mark V accessory mount lock and power plant lock, and the strip sander eccentric mounting tubes.
- Never exceed speed setting K (2050 RPM) on the Mark V speed dial.
- Never turn on the machine with anything laying on the table or stock held against the belt.
- If you hear a ticking sound or other unusual noise, stop the strip sander immediately. A ticking sound often indicates a damaged belt.
- Never leave the cover open while the strip sander is in operation.
- Never attach a dust collection system to the strip sander during grinding operations. Sparks and/or hot pieces of metal could ignite the sawdust or debris in the collection bag.
Strip Sander Speeds
Before you begin any strip sander operation, turn on the Mark V, set the speed dial to the proper speed and let the machine get up to speed.
The speed setting is determined by the material being sanded, the type of abrasive belt and the size of the platen. Use Table 20-1 to determine the proper setting.
Strip Sander Belts and Platens
The strip sander uses aluminum oxide, garnet and silicon-carbide belts of various grits in 1/2″ x 42″ and 1″ x 42″ sizes. Use aluminum oxide belts for sanding wood, metal and plastic; garnet for wood and plastic; and silicon-carbide for metal. A felt polishing belt and buffing compounds are also available for polishing metal and plastic.
The platens provide a firm backup for the belts and keep them tracking properly during sanding operations. There are three sizes of platens: 1″ flat, 1/2″ flat, and 1/2″ radius curved.
Table 20-1 contains information about the belts and platens that are available for the strip sander.
Strip Sander Operation
To perform sanding operations, turn on the Mark V, set the speed dial to the proper speed and let the machine get up to speed.
Work with the stock against the downward motion side of the belt only. The downward motion keeps the belt tracking properly and helps hold the stock down against the table. Work slowly and use light pressure against the belt. Whenever possible, sand with a platen installed. You can sand without a platen when sanding concave curves and internal edges. However, use a slower speed and very light pressure so the belt tracks properly and is not pulled off the tracking wheel. Caution: If the belt is pulled off the tracking wheel, parts of the strip sander could be damaged.
End Sanding
Hold the edge of the stock down against the table and the end you want to sand against the belt and platen (Figure 20-2). Apply enough pressure to sand without gouging the stock.
Sanding Angles
Loosen the table lock knob, tilt the table to the desired angle and tighten the knob. Hold the edge of the stock down against the table and the sawn angle against the belt and platen (Figure 20-3). Ap
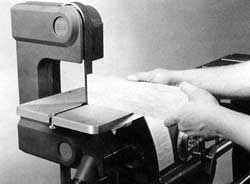
Sanding Convex Curves
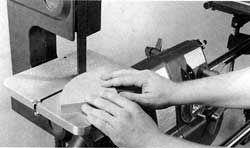
Hold the stock firmly against the table and follow the line of the curve in a slow, steady motion. Apply light pressure against the belt and platen (Figure 20-4).
Sanding Concave Curves
To sand concave curves, use the curved platen or sand without a platen.
Follow the cut in a slow, steady motion while keeping the stock flat against the table. Apply light, even pressure against the belt (Figure 20-5). Be careful not to hook the stock on the belt. You could pull the belt off the tracking wheel.
When sanding without a platen apply less pressure, use a slower speed and watch belt tracking constantly. Be careful not to pull the belt off the tracking wheel.

Internal Sanding
To perform internal sanding operations, you must change the location of the left idler wheel assembly and install the belt up through the table. Refer to the Strip Sander Owners Manual for instructions on relocating the left idler wheel assembly and installing the belt.
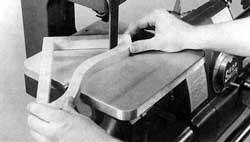
Internal sanding is done basically like sanding concave and convex curves. Sanding the internal edges of a shelf support is shown in Figure 20-6.
Warning: Sand on the downward motion side of the belt. The downward motion keeps the belt tracking properly and helps hold the stock down against the table.
You can internal sand with or without a platen installed. When sanding without a platen, work at a slow speed and be careful not to pull the belt off the tracking wheel.

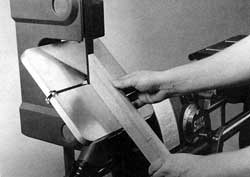
Sanding Against the Tracking Wheel
Sand odd-shaped or concave workpieces against the tracking wheel (Figure 20-7). Hold the workpiece securely in your hands and sand the workpiece in the center of the wheel. Work carefully so you don’t pull the belt off the tracking wheel.
Sanding Other Materials
You can sand plastics and metals, and perform buffing operations with the strip sander. Refer to Table 20-1 to determine which belts, platens and speeds to use for these materials.

